Environment
- SAP BO PLATFORM 4.0 SP04
- APACHE TOMCAT 7.0 JAVA APPLICATION SERVER
Solution
Tomcat 7 can be downloaded from following location
A. Installing Tomcat 7:
1. Extract the contents of apache-tomcat-7.0.29-windows-x64.zip file to C:\Program Files(x86)\SAP BusinessObjects folder. Rename the folder apache-tomcat-7.0.29 thus created to Tomcat7.
2. Create a folder Catalina in C:\Program Files (x86)\SAP BusinessObjects\Tomcat7\conf folder.
3. Create a folder localhost in C:\Program Files (x86)\SAP BusinessObjects\Tomcat7\conf\Catalina folder.
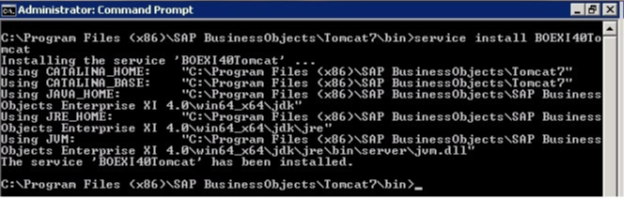
4.Open a Command Prompt in elevated mode if you are using MS Windows Server 2008. Navigate to the directoryC:\Program Files (x86)\SAP BusinessObjects\Tomcat7\bin.
5. Run command service install BOEXI40Tomcat.
You should get an output like this:
6.Go to C:\Program Files (x86)\SAP BusinessObjects\Tomcat7\bin through Windows Explorer. Create a shortcut here forTomcat7w.exe. Rename this shortcut as Tomcat Configuration.
7. Right click on the Tomcat Configuration file & click Properties. The Shortcut tab will be displayed by default. Add text //ES//BOEXI40Tomcat in Target field after the existing entry separated by a space. Click on Apply OK.
8. Copy this Tomcat Configuration file to C:\Documents and Settings\All Users\Start Menu\Programs\Tomcat folder. Copy this file to C:\ProgramData\Microsoft\Windows\Start Menu\Programs\Tomcat if you are using MS Windows Server 2008. Click on Yes if the Confirm File Replace dialog box appears. If you are using MS Windows Server 2008, click on Copy and Replace.
B. Configuring Tomcat:
- Click on Start > All Programs > Tomcat > Tomcat Configuration. This will launch the Apache Tomcat BOEXI40TomcatProperties tool. You will have to open this tool in elevated mode if you are using MS Windows Server 2008
- On the General tab, change the Display name to Apache Tomcat 7.0.29. Delete all contents in the Description field. Change the Startup type to Automatic. Click on Apply.
- Click on the Logging tab. Change the Level to Error. Delete contents of Log-prefix field.
- Copy line “C:\Program Files (x86)\SAP BusinessObjects\Tomcat7\logs\stdout.log” to the Redirect Stdout field
- Copy line “C:\Program Files (x86)\SAP BusinessObjects\Tomcat7\logs\stderr.log” to the Redirect Stderror field. Click on Apply
- Click on the Java tab. Add the path “C:\Program Files (x86)\SAP BusinessObjects\SAP BusinessObjects Enterprise XI 4.0\win64_x64\jdk\lib\tools.jar” in Java Classpath field after the existing entry separated by a semi-colon(;)
- Add the value 2048 in Maximum memory pool field
- Delete following parameters from the Java Options field
-Djava.io.tmpdir=C:\Program Files (x86)\SAP BusinessObjects\Tomcat7\temp
-Djava.util.logging.manager=org.apache.juli.ClassLoaderLogManage
-Djava.util.logging.config.file=C:\Program Files (x86)\SAP BusinessObjects\Tomcat7\conf\logging.properties
- Add following parameters to the Java Options field.
-Djava.library.path=C:\Windows\SysWOW64\;C:\Program Files (x86)\SAP BusinessObjects\SAP BusinessObjects Enterprise XI 4.0\win64_x64\
-Dbobj.enterprise.home=C:\Program Files (x86)\SAP BusinessObjects\SAP BusinessObjects Enterprise XI 4.0\
-Xrs
-XX:MaxPermSize=384M
-Dbusinessobjects.olap.bin=
-Dbusinessobjects.olap.stylesheets=
-Djava.awt.headless=true - Click on Apply. You may add some additional parameters to the Java Options field apart from the above mentioned if they were present on previous Tomcat. We have saved Java Options of previous Tomcat in a text file.
- Click on Startup tab. Copy the path “C:\Program Files (x86)\SAP BusinessObjects\Tomcat7″ to the Working Path field. Click on Apply.
- Click on Shutdown tab. Copy the path “C:\Program Files (x86)\SAP BusinessObjects\Tomcat7″ to the Working Path field. Click on Apply OK
C. Deploying web applications (WAR files):
- Open the file config.tomcat7 in Notepad. It can be located in C:\Program Files (x86)\SAP BusinessObjects\SAP BusinessObjects Enterprise XI 4.0\wdeploy\conf folder.
2. Assign the following values to the respective variables:
as_dir= C:\Program Files (x86)\SAP BusinessObjects\Tomcat7
as_instance=localhost
as_service_name=BOEXI40Tomcat
Save & close the file.
3. Open a Command Prompt in elevated mode if you are using MS Windows Server 2008. Navigate to the directoryC:\Program Files (x86)\SAP BusinessObjects\SAP BusinessObjects Enterprise XI 4.0\wdeploy.
4. Run the command wdeploy tomcat7 validateconfig to check if you have made the correct changes in config.tomcat7 file.
5. A BUILD SUCCESSFUL message will appear if the validation is successful.
6. Now run the command wdeploy tomcat7 deployall to deploy the WAR files of SAP BO BI 4.0 on Tomcat 7.
7. A BUILD SUCCESSFUL message will appear once all the WAR files are successfully deployed.
8. Click on Start > All Programs > Tomcat > Tomcat Configuration. This will launch the Apache Tomcat 7.0.29 Properties tool. Start Tomcat by clicking on Start button available on General tab. You will have to open this tool in elevated mode if you are using MS Windows Server 2008.
9. Wait for 10 – 15 minutes until the Catalina servlet initializes itself & starts all applications.
10. Now test BI Launchpad, CMC & Query Builder & Web Services to check if they are working fine with Tomcat 7.0.29 as Web Application Server.
Hope you find this useful.
Cheers,
Umang Patel
+919979084870
SAP BO BI Solution Architect/Consultant
Umang Patel
+919979084870
SAP BO BI Solution Architect/Consultant
No comments:
Post a Comment